
How to plant your garlic legacy
Buying your seed
Start with good, healthy seed.
Since the seed garlic you buy is simply the cloves from another plant, you are effectively planting a clone of another plant. This means it is important that you are using good stock. You want to make sure it is not contaminated with disease or pests, which means you need to trust your source. We take great care in ensuring we maintain good quality garlic and only select the best of our bulbs for selling as seed.
If you want to grow out your stock, you can reserve more of your harvest for planting the next fall and/or for hardneck varieties you can let a couple of your garlic plants send out its scape and flower. The flower will produce bulbils. These look like teeny tiny little cloves. You can plant these in the ground with the same care as your cloves and over the years of doing this over and over with the same bulbils, they will grow in size. You have to be a very committed garlic grower to do this!
Also make sure you select seed that suits your needs and climate. If you are a part-time gardener, choose a variety that suits your climate. But if you are interested in starting a garlic legacy of your own then you might want to start with a more diverse selection that you can grow out over time.
Preparing your soil
Plant into good, healthy soil.
We begin preparing our soil in the late spring. We cover crop and this year we even ran our chickens through the area in hopes that they would eat up any wireworm (that can do damage to the roots of most vegetables). This organic matter gets turned into the soil thereby adding more humus and loam that garlic loves!
A shorter quicker way to do this might be for you to add finished compost, which you can do right before planting. But ultimately to know exactly what your garden soil might need in preparation, you should do a soil test. Garlic requires more nitrogen than you might think, phosphorus for root development and we find our garlic really responds when we add micronutrients especially if your soil test reveals you are low on something. Boron is an example of a micronutrient that our soil is often low in and so we have to amend for this on a yearly basis.
Do not over fertilize though! If you add too much of something you can sometimes do more damage than not adding enough.
Garlic likes to grow in well-drained, loose and weed-free soil. If you can choose what type of soil you grow your garlic in, choose sandy-loamy soil. It will allow your bulbs to push out easier as they grow, prevents an excessively wet growing environment, and makes it easier to clean the bulbs after harvest., If you have clay soil to work with simply add a good amount of loamy compost and consider raising your beds to help with reducing moisture content over winter and in the spring.
In the spring, consider offering your garlic a little more juice. We add an organic general purpose liquid fertilizer and liquid form of micronutrients. The fertilizer you applied in the late summer or fall may have been used up by the garlic plant sending out its roots for over-winter and if you live in a climate with rainy winters, it is likely that you lost some nutrients via leeching. Make sure to follow directions on the container if you do add more fertilizer in the spring.
Weed control
Garlic does not do well in weedy environments. In order to create good air circulation between plants and to prevent competition for rooting space, keep your beds weed free!
You may also want to consider "stale bedding". Have your beds ready 1-2 weeks in advance of when you want to plant your garlic. Allow for any perennial weeds to emerge that you can pull out in advance and then any annual weed seeds can be removed.
We remove annual weeds in 3 main ways:
Mulch with a black tarp. Set it over top of your prepared bed. This will encourage warmth in your soil and thus stimulate weed seeds to germinate. The tiny little weeds hit the tarp and succumb to their death due to a lack of light and over-heating. Leave a tarp on in sunny weather for up to one to two weeks in advance of wanting to plant your garlic. Remove the tarp and it is ready to plant! Or make holes in your tarp and plant right into the tarp for a weed free bed all season long. At Earth Apple we have had great success with this method- although it is a little bit more work upfront.
Flame weed. Use a flame weeder or a small roofing torch to burn the weeds off your beds before you plant into them. Again, after preparing your garlic beds, allow the annual weeds to germinate, which may take 1-2 weeks depending on the weather. If you have straight sun then you will want to evenly water the surface of your bed to encourage germination (seeds need heat and moisture to germinate). When your weeds emerge and they are all still teeny tiny (don't wait for them to get big or this may not work), quickly run the flame over the weeds. You do not need to apply your flame for very long. The heat will cause the cells of the leaf membrane to combust, which may not be evident right away. They will eventually wilt and die leaving you a clean canvas to work your garlic magic in!
If you don't have too bad of a weed problem then once may be enough. And if this is the case you can actually just flame weed after you plant your cloves in the soil. They will not likely be emerging for some weeks or not at all until the spring. If you have a very weedy plot to work in then you may want to consider flame weeding before and a couple weeks after planting.
Hoe Hoe Hoe! The age old method of simply scraping the baby weeds off the surface of your soil bed is also a reliable and simple way to cut back on weeds. Make sure your hoe is sharp, because the goal is to get the little weeds while they are still small and chop off their heads before they form any kind of substantial root mass underground. Since you can't flame weed once the garlic has emerged and you may not all have tapped your beds you can continue to hoe through the spring and summer as your garlic grows big and tall. Consider your spacing when planting in this sense. You may want to be able to drag a hoe between plants later on. However, if you mulch then you are committed to hand pulling anyway.
Mulching
To mulch or not to mulch. Perhaps you are using a black tarp to plant your garlic in, but maybe you are more old-fashioned traditional and would like to use a more organic method. If you use straw or hay try to make sure you source from a farm that you can trust will not have too many weed seeds hidden in their bales. You don't want to add anything to your farm or garden that will add more weeds and more work!
Many people who grow garlic like to mulch their garlic beds with straw or hay or even leaves. Mulching insulates the soil over winter from getting too cold and it also can act as a weed suppressant. Over winter, the mulch will help prevent rain from leeching the soil of its nutrients and also prevent erosion of the soil on the surface of your beds. Any weeds that do get through the mulch will have to likely be hand-pulled though since hoeing will not be possible.
Planting
Well before you mulch that bed with straw or hay, you want to plant it! Have your cloves pulled apart ahead before you begin to plant. This makes planting go a lot easier if you are not having to pull apart bulbs as you plant and get your hands all potentially gooped up with mud. However, do not pull your bulbs apart too far ahead of the time you are planning on planting. Cloves tend to stay stronger and healthier as a whole in the bulb. You want to plant a strong healthy clove!
Try to keep the paper on, but if it comes off it isn't too much of a concern. Most importantly you are handling your cloves very carefully to make sure they do not get bruised or damaged. Farmer Mike always says treat your garlic like you would eggs. They are more delicate than you might think. Choose all the largest cloves in the bulb for planting. Little ones can go into your dinner that night or in the case that you have a lot (like we do) you can make garlic powder out of them! Check out our recipe page for instructions on how to do this.
If you are planting multiple varieties have very clearly labeled containers to keep the varieties separate and also have some labeled stakes ready ahead of time so you can mark where you planted each variety.
We like to give our cloves a little sauce before planting...Yup, we get 'em drunk. No kidding. To ensure that there are no little critters (mites) occupying our next year's #NewMountainGarlic legacy we dip our cloves in alcohol before planting. Here is our secret recipe:
Once you have your bulbs pulled apart and have selected which cloves you are planting you can place them in a sieve and then soak them for 15 minutes in a solution of water 60% and alcohol 40%. So if you're feeling fancy that means you can simply soak them in cheap vodka. Or what we like to do is purchase rubbing alcohol, which has a much higher concentration (usually 80-90%) and add water to make it the correct dilution. This soaking solution will take care of any mites that might be hanging out in your cloves and/or fungal spores too.
After soaking them for 15 minutes (and no more!) we rinse the cloves with water to remove any alcohol remaining on the skin of the cloves. Now to give them a little boost that will allow them to begin their sprouting for when you plant them in the ground. We like to use kelp meal mixed with water. We will put all of our rinsed cloves into a bucket with a solution of kelp meal and water and let them soak for anywhere between one hour or even over night. Then strain them out and they are ready to plant in the ground!
There are definitely various opinions on how much spacing is required between plants. We have 4' wide beds and we plant 5 rows per bed about 7" apart. We also take very good care of the soil, raise the beds a little to ensure good drainage and make sure to stay weed free to keep the air moving through the plants. Some may prefer to have less tighter spacing, but it definitely depends on a number of factors. You will need to choose what's right for you and in your growing conditions.
Typically the clove is buried down twice the size of the clove itself. Make sure the pointy end is up (where the sprout will emerge). Cover with soil and voila! Your garlic is in the ground.
This is where we loop back to --to mulch or not to mulch and if mulch what mulch!
Fertilizing
We like to fertilize a couple times in the spring before the hardencks begin to scape. We use foliar spray, a combination of a general purpose liquid fertilizer, kelp meal, and micronutrients. Make sure to follow the labels to ensure you don't over-fertilize.
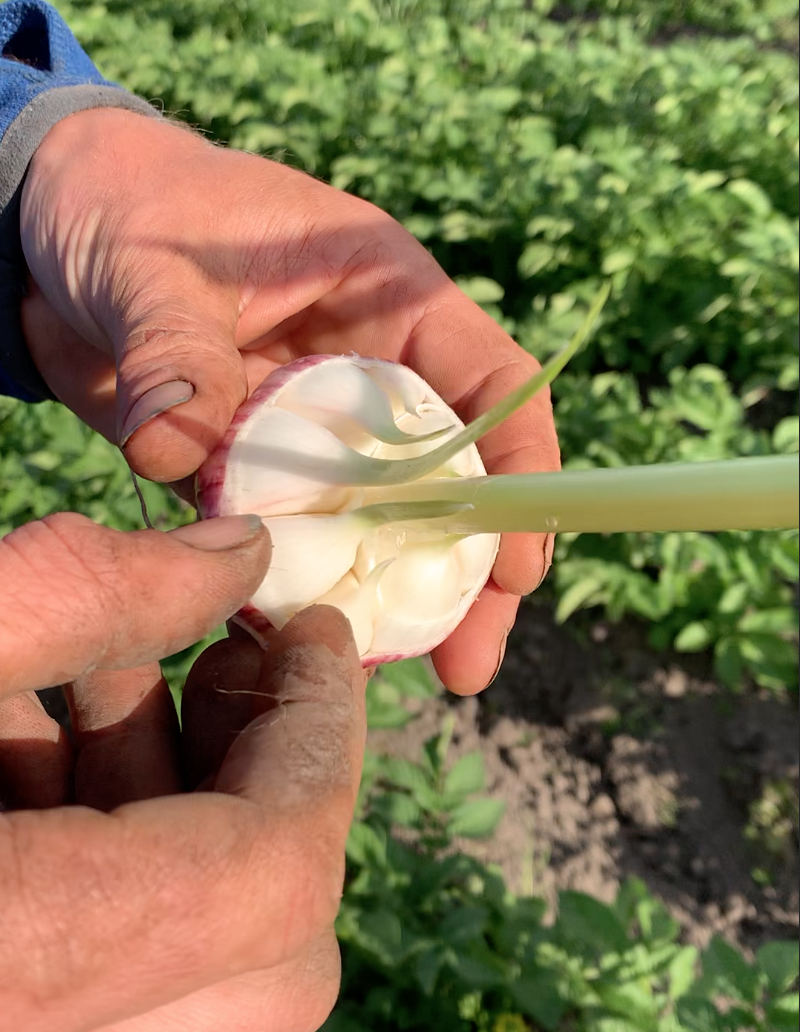
Scaping
If you are growing hardneck varieties of garlic you will want to remove your scapes, which typically happens early to mid-June depending on which variety you are growing. The scapes come in different shapes and sizes according to the variety. Some are straight and some are single loop and some are double loopy. By removing the scapes (the unopen flower of the plant), you are essentially forcing the plant to send its energy back down to its other method of reproduction-- the bulb. In this way you will grow bigger bulbs.
However, if you want your hardneck garlic to grow its flower out so you can see the umbel and collect the bulbils to grow out your seed reserve then leave some scapes on! See more about bulbils below.
The scapes are a delicious treat that you can add to your cuisine or send to your markets while everyone waits on the bulbous prize a little further into the season.
the Harvest
And now for the grand finale! All your hard work to grow big, beautiful, juicy, flavourful pungent garlic pays off and you get to reap the rewards. Knowing when your garlic is ready to harvest is key. Watch the video below of Farmer Mike explaining how he can tell his garlic is ready to harvest.
Some people wait for the tops to start to die off. This isn't necessarily your best bet since at that point (depending on the weather conditions you are facing) the skins on the bulb in the ground may also have begun to deteriorate. You want good healthy skins on your bulb when you harvest so they can cure properly.
When pulling your garlic up out of the ground, you want to get a pitchfork or shovel under there (being very careful not to stick it through the bulb!) and loosen the soil from the roots underneath. You don't want to just pull on the garlic or you risk separating papers from the bulb and even pulling the stem right off. That garlic has been sitting there for 9-10 months and it has likely settled in very well. And be gentle with your garlic. It might seem tough, but it can bruise and any damage to the bulb will compromise its ability to store well.
Watch this video of Farmer Mike explaining how to know when your garlic is ready.
Curing Your Garlic
To ensure your garlic lasts in storage for several months you will want to "cure" your garlic. We use the loft of our barn to hang the garlic and put fans on to keep air moving. Essentially you need a dry, airy environment that is not overly warm, but not cool either. Around 24°C to 27°C is ideal with low humidity. We also like using the loft because there is no direct light entering the barn, which is also important. Let it hang for about 2 weeks, make sure the skins are dry right through and then you can begin cutting it down and cleaning it up to store in crates for the winter.
And then Bon Appetit!